Cheesecake Cookie Cups Recipe
Introduction
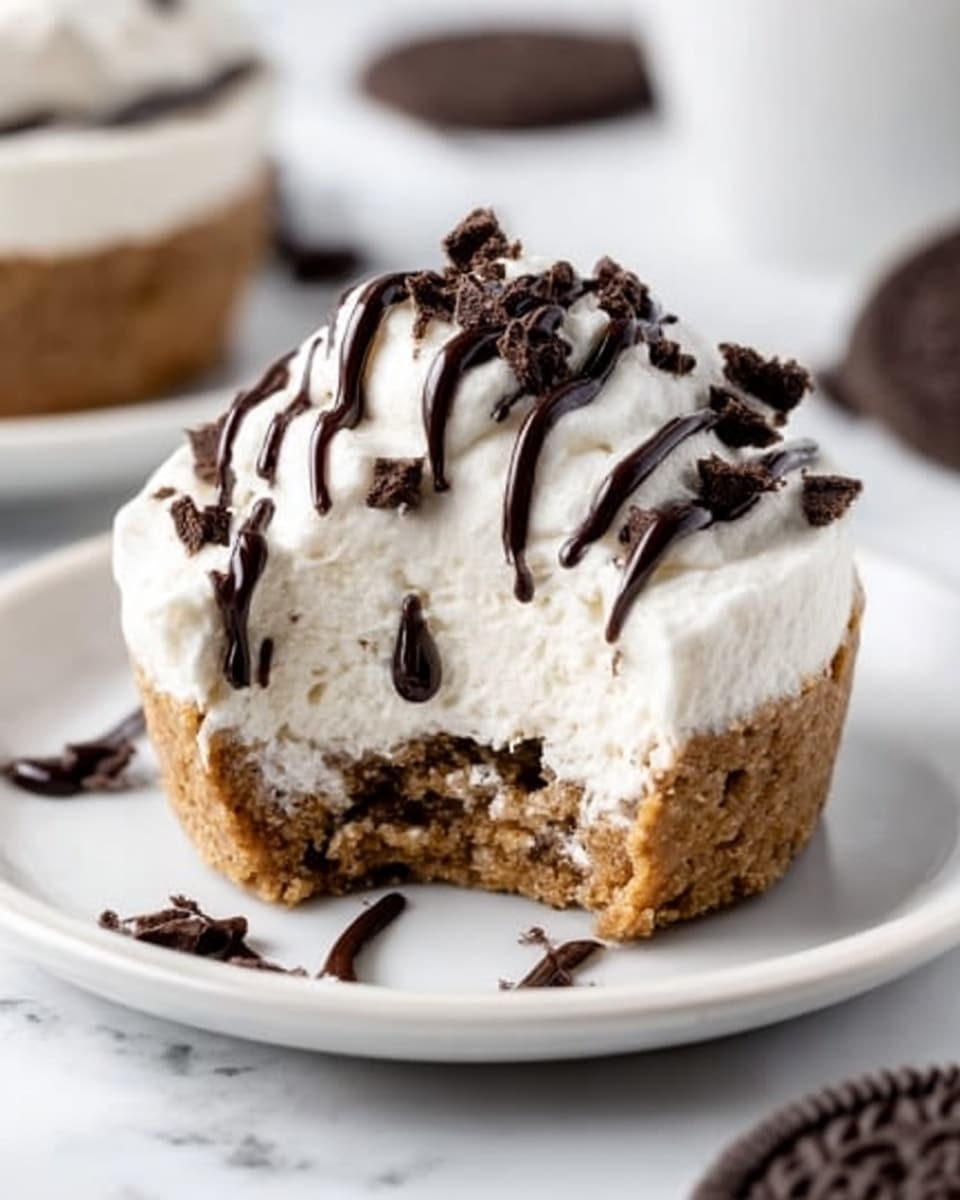
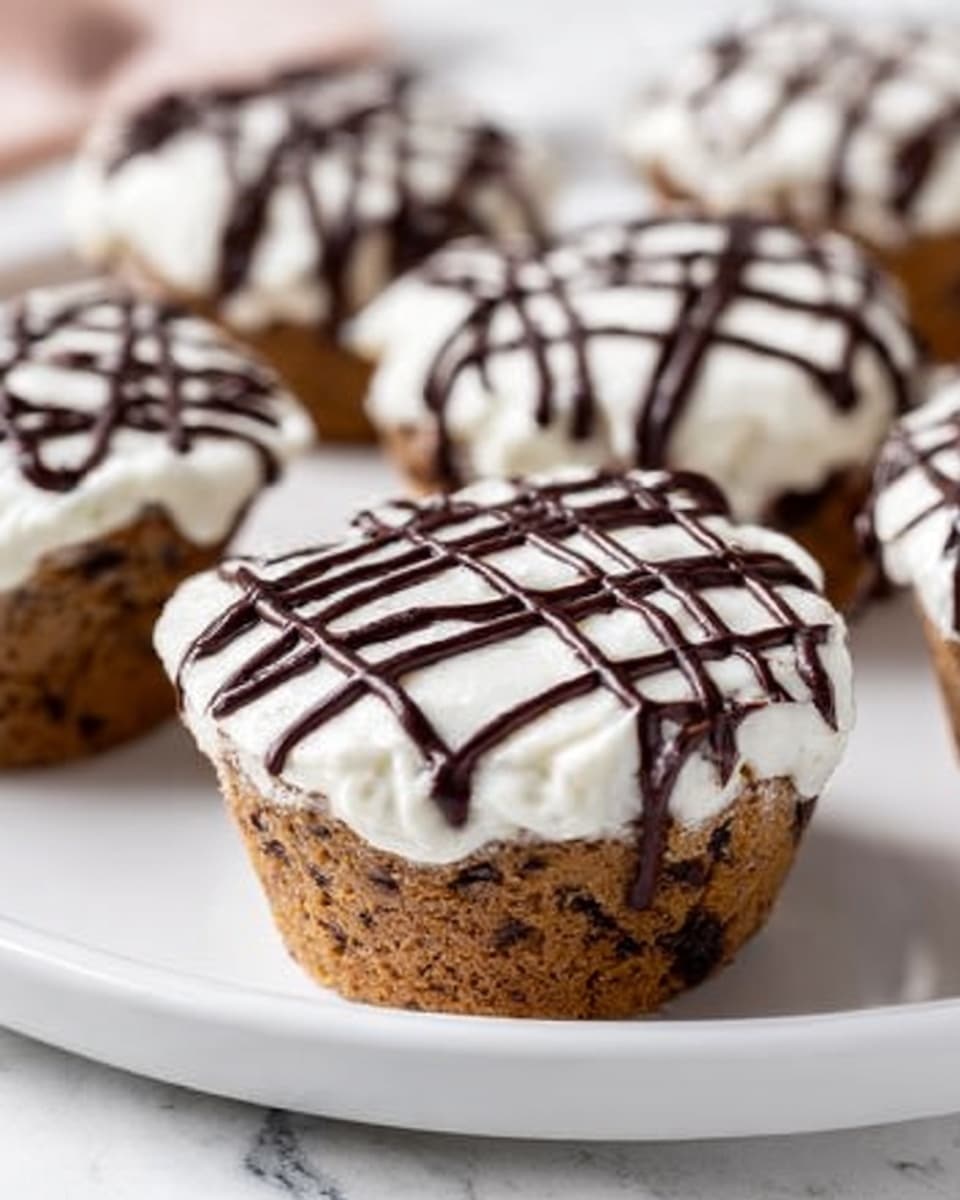
Cheesecake Cookie Cups are a delightful twist on classic desserts, combining soft cookie cups with creamy cheesecake filling and a drizzle of melted chocolate. These bite-sized treats are perfect for parties or whenever you crave a sweet, indulgent snack.
Ingredients
- 16.5 ounce chocolate chip cookie dough (or your favorite homemade cookie dough, prepared)
- 8 ounce cream cheese (softened to room temperature)
- 1 cup heavy cream
- ½ cup granulated white sugar
- 1 teaspoon vanilla extract
- ¼ cup chocolate chips (Ghirardelli baking chips recommended)
Instructions
- Step 1: Preheat oven to 350°F. Line a cupcake pan with liners and set aside.
- Step 2: Slice the cookie dough into 12 equal portions, about ½ inch thick. Press each portion into the cupcake liners, forming small cups.
- Step 3: Bake for 8-10 minutes or until the cookie cups turn golden brown. Remove from oven and let them cool completely.
- Step 4: While the cookie cups cool, place the softened cream cheese into a medium mixing bowl. Beat on medium speed with a hand mixer until smooth and light. Set aside.
- Step 5: In a separate large bowl, add the cold heavy cream. Beat on medium speed for 4-5 minutes until it becomes fluffy and almost cloud-like in texture.
- Step 6: Gently fold the whipped cream cheese, sugar, and vanilla extract into the whipped cream. Mix carefully to combine without deflating the whipped cream. Chill in the refrigerator if the cookie cups are not yet fully cooled.
- Step 7: Once cooled, use a medium cookie scoop or a piping bag to evenly fill each cookie cup with the cheesecake filling.
- Step 8: Refrigerate the filled cookie cups for about 30 minutes to allow the filling to set slightly.
- Step 9: Melt the chocolate chips in a microwave-safe bowl by heating for 30 seconds, stirring, and repeating until smooth and fully melted.
- Step 10: Transfer the melted chocolate to a small plastic bag, snip off a tiny corner, and pipe the chocolate over the cheesecake cups. Alternatively, drizzle it on with a spoon.
- Step 11: Return the cookie cups to the fridge and chill until ready to serve.
Tips & Variations
- Use homemade cookie dough or switch the flavor to peanut butter or sugar cookie dough for a unique twist.
- For a smoother filling, make sure the cream cheese is fully softened before mixing.
- If you don’t have a piping bag, a zip-top bag works well for piping the filling and chocolate.
- Add chopped nuts or sprinkles on top for extra texture and color.
Storage
Store the cheesecake cookie cups in an airtight container in the refrigerator for up to 3 days. For best flavor and texture, enjoy them within this timeframe. If needed, allow them to sit at room temperature for a few minutes before serving to soften the filling slightly.
How to Serve
Serve this delicious recipe with your favorite sides.
FAQs
Can I make these ahead of time?
Yes, you can prepare the cookie cups and filling in advance. Assemble and store them in the refrigerator, adding the chocolate drizzle just before serving to maintain a fresh look.
Can I freeze cheesecake cookie cups?
Freezing is possible but may affect the texture. If you freeze them, thaw overnight in the refrigerator and give them some time at room temperature before serving.
PrintCheesecake Cookie Cups Recipe
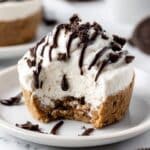
These Cheesecake Cookie Cups combine the best of both worlds—a crisp, golden-baked cookie cup filled with light and fluffy cream cheese filling, topped with melted chocolate drizzles. Perfect for impressing guests or indulging in a sweet treat, this recipe is simple and delicious, using easy-to-find ingredients and no special techniques.
- Prep Time: 15 minutes
- Cook Time: 10 minutes
- Total Time: 55 minutes
- Yield: 12 cheesecake cookie cups 1x
- Category: Dessert
- Method: Baking
- Cuisine: American
Ingredients
Cookie Cups
- 16.5 ounces chocolate chip cookie dough (or your favorite homemade cookie dough, prepared)
Cheesecake Filling
- 8 ounces cream cheese (softened to room temperature)
- 1 cup heavy cream
- ½ cup granulated white sugar
- 1 teaspoon vanilla extract
Topping
- ¼ cup chocolate chips (preferably Ghirardelli baking chips)
Instructions
- Preheat and Prepare Pan: Preheat your oven to 350°F (175°C). Line a cupcake pan with liners and set aside to make baking easier and cleanup faster.
- Shape Cookie Cups: Slice the cookie dough into 12 equal portions, each about ½ inch thick. Press each portion firmly into the lined cupcake pan cavities to form cookie cups.
- Bake Cookie Cups: Bake in the preheated oven for 8-10 minutes until golden brown around the edges. Remove from oven and let cool completely.
- Prepare Cream Cheese Base: In a medium mixing bowl, beat the softened cream cheese on medium speed with a hand mixer until light and fluffy. Set aside for combining later.
- Whip Heavy Cream: In a separate large mixing bowl, beat the cold heavy cream on medium speed for 4-5 minutes, or until it forms fluffy, cloud-like peaks.
- Combine Filling: Gently fold the cream cheese mixture, sugar, and vanilla extract into the whipped cream until well combined but still airy. Avoid overmixing to maintain the fluffy texture. Chill if needed until cookie cups are cool.
- Fill Cookie Cups: Once the cookie cups have cooled, use a medium cookie scoop or a piping bag to portion the cheesecake filling evenly among the 12 cookie cups.
- Chill to Set: Place the filled cookie cups into the refrigerator and allow them to set for about 30 minutes.
- Melt Chocolate Chips: Transfer the chocolate chips to a microwave-safe bowl. Microwave in 30-second intervals, stirring in between, until the chocolate is smooth and completely melted.
- Decorate: Pour the melted chocolate into a small plastic bag, snip off a tiny corner, and pipe drizzles over the cheesecake cookie cups. Alternatively, simply drizzle the chocolate over with a spoon.
- Final Chill: Refrigerate the decorated cookie cups until ready to serve to allow the chocolate to firm up and flavors to meld.
Notes
- Be sure to use room-temperature cream cheese for the smoothest filling.
- Do not overmix the filling to keep it light and airy.
- If homemade cookie dough is used, ensure it is similar in moisture and sweetness to chocolate chip dough.
- The cookie cups can be made a day ahead and refrigerated.
- Use good quality chocolate chips for best melting results and taste.
Keywords: cheesecake cookie cups, chocolate chip cookie dough, no-bake cheesecake filling, chocolate drizzle dessert, easy party dessert