Monster Eyeballs Recipe
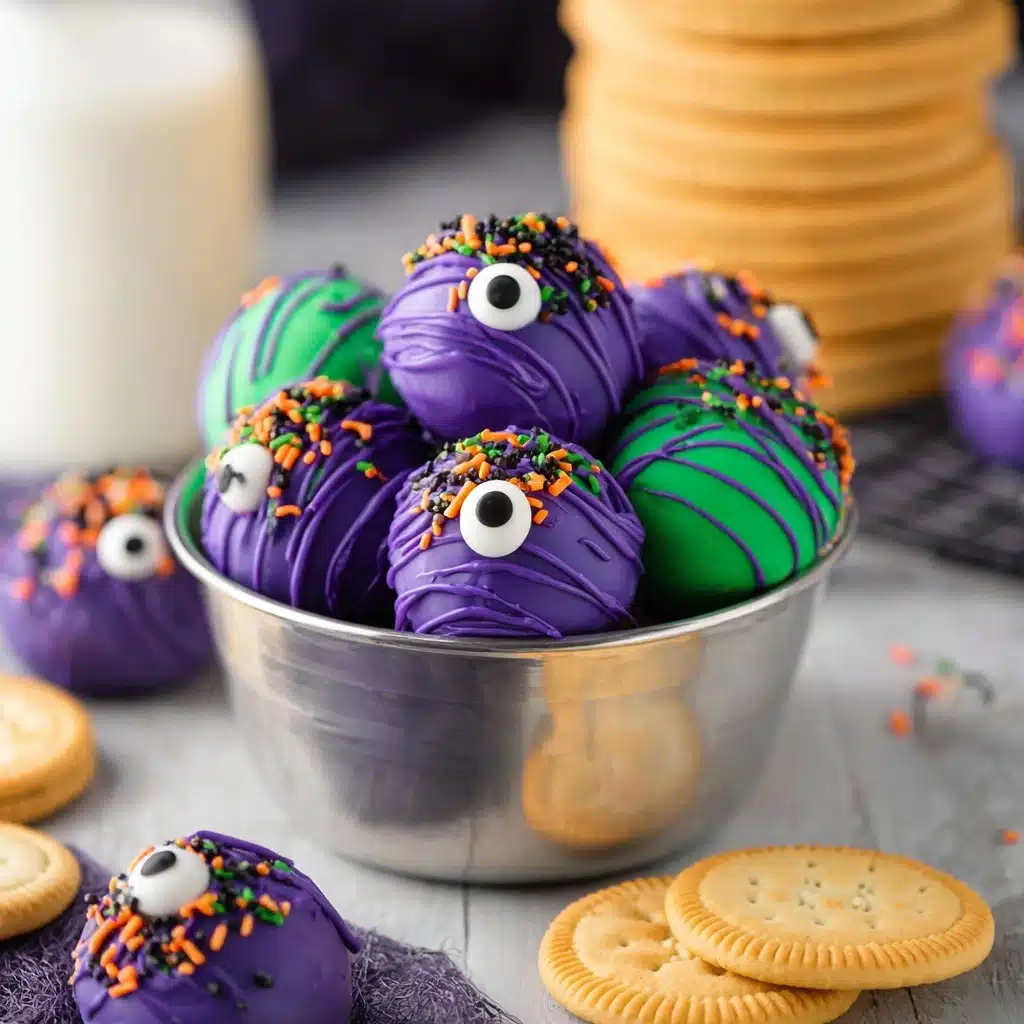
If you are looking for a spooky yet utterly delicious treat to wow your friends or family, these Monster Eyeballs are just the ticket. Imagine biting into a creamy, Oreo-packed truffle that’s coated in vibrant candy melts, topped with whimsical candy eyes, and sprinkled like it’s covered in colorful, edible hair. The combination of the cookie crumb texture, smooth cream cheese filling, and that sweet, crunchy outer shell makes Monster Eyeballs a creepy-cute dessert that’s surprisingly simple to make but endlessly fun to eat. Whether it’s for a party, Halloween, or just because you love vibrant treats, these Monster Eyeballs will definitely steal the spotlight.
Ingredients You’ll Need
Nothing fancy or hard to find here—just a handful of ingredients that come together beautifully to create the perfect balance of flavor, texture, and that striking monster look. Each one plays a crucial role: the Oreos offer that classic chocolate crunch, the cream cheese adds luscious creaminess, and the candy melts bring vibrant color along with a smooth finish.
- Golden Oreos (19.1 ounces family-size package): Provides the base crumbly texture and sweet cookie flavor without the typical dark chocolate color, perfect for a monster eye canvas.
- Cream cheese (¾ package or 8 ounces, room temperature): Adds a creamy binder that makes the mixture moist and easily moldable into balls.
- Colored candy melts (12 ounces): These melt smoothly for dipping and create a shiny, colorful shell that makes each eyeball pop visually.
- Color-matching sprinkles (½ cup): Adds fun texture and vibrant “hair” to give personality and charm to each Monster Eyeball.
- Large candy eyes (24 pieces): The star of the show, these give each truffle its distinct, playful monster look.
How to Make Monster Eyeballs
Step 1: Crushing the Oreos
The first step to your Monster Eyeballs success starts by putting all those golden Oreos into a food processor. Pulse until you get fine, crumb-like bits that will be the foundation for your creamy mixture. This is where that classic cookie flavor starts to build.
Step 2: Combine with Cream Cheese
Add the room temperature cream cheese to the Oreo crumbs. Pulse again until the mixture is smooth and fully combined. This will make your mixture sticky and soft enough to roll into perfect little balls that hold together well but melt in your mouth.
Step 3: Form the Monster Balls
Use a 1½ tablespoon cookie scoop to measure out dough portions. Roll each portion between your palms to form smooth spheres. Lining them up on parchment helps keep everything clean and prevents sticking — these will chill in the refrigerator shortly to firm up.
Step 4: Chill Your Creation
Pop the sheet of rolled balls into the refrigerator for at least 15 to 30 minutes or up to an hour. This chilling step is crucial as it helps the truffles firm up so they can handle the next step — coating.
Step 5: Melt the Candy Coating
Heat your colored candy melts in a microwave-safe bowl starting with 45 seconds, stirring well afterward. Continue microwaving in short 10-20 second bursts, stirring until fully smooth and ready for dipping. Smooth candy melts ensure an even, glossy coating on your Monster Eyeballs.
Step 6: Dip and Decorate
Using a fork or dipping tool, coat each chilled truffle thoroughly with the melted candy. Set them down on a clean parchment sheet and immediately press a large candy eye onto each one. While the coating is still wet, add color-matching sprinkles on top to create a wild, fun “hair” effect that brings your Monster Eyeballs to life.
Step 7: Final Chill and Set
Put the decorated Monster Eyeballs back into the refrigerator for at least 30 minutes to let the candy coating harden completely. This final step locks in the vibrant colors and ensures the treats look as stunning as they taste.
How to Serve Monster Eyeballs

Garnishes
Enhance the fun by garnishing your Monster Eyeballs plate with additional sprinkles, crushed colored candies, or edible glitter. These small touches make the presentation pop and invite everyone to dive in with excitement.
Side Dishes
Serve these with a simple glass of cold milk or a cup of creamy hot chocolate to balance the sweet richness. For a festive party, pair Monster Eyeballs with other colorful treats or even a fruity punch to keep the spooky theme playful and delicious.
Creative Ways to Present
Try arranging your Monster Eyeballs on skewers for a quirky “eye pops” display or nestle them in paper cupcake liners for neat individual servings. You can also place them atop a thick spread of frosting on cupcakes or cakes for an eye-catching monster-themed centerpiece.
Make Ahead and Storage
Storing Leftovers
Store your Monster Eyeballs in an airtight container in the refrigerator where they’ll stay fresh for up to a week. Keeping them cool preserves the creamy texture inside and the firm candy shell outside.
Freezing
If you want to keep these delicious treats even longer, freezing is a great option. Place the Monster Eyeballs on a baking sheet until frozen solid, then transfer them to a freezer-safe bag. They can last up to 2 months this way without losing flavor or texture.
Reheating
Thaw frozen Monster Eyeballs in the refrigerator for a few hours before serving. Avoid microwaving, as the candy coating can melt unevenly and lose its crunch.
FAQs
Can I use regular Oreos instead of golden Oreos for Monster Eyeballs?
Absolutely! Regular Oreos will work perfectly, though the color of your finished Monster Eyeballs will be darker. Golden Oreos give a fun twist with a lighter base that lets the candy colors stand out more.
What if I don’t have a food processor?
No worries! You can place the Oreos in a sealed plastic bag and crush them with a rolling pin until fine. Then mix by hand with the cream cheese until fully combined.
Can I use a different type of candy for coating?
You can experiment with white chocolate or colored melts of your choice. Just make sure they melt smoothly and aren’t too thick or thin for coating.
Do the Monster Eyeballs need to be refrigerated?
Yes, keeping them chilled helps maintain their texture and keeps the candy coating firm and shiny. It’s best to serve them cool though not overly cold.
Are Monster Eyeballs kid-friendly?
Definitely! Kids love the fun eyes and sprinkles, and these treats are soft and easy to eat. Just be mindful of any candy allergies in your group when choosing sprinkles and candy eyes.
Final Thoughts
Monster Eyeballs are one of those magical recipes that combine simple ingredients with playful presentation to create an unforgettable treat. Whether you’re making them for a spooky occasion or as a fun dessert any time of year, these little truffles will bring big smiles and even bigger cravings. So go ahead and give this recipe a try—you’ll have fun making them and even more fun eating every colorful, creamy bite!
PrintMonster Eyeballs Recipe
Monster Eyeballs are spooky and delicious Oreo truffles coated in colorful candy melts, decorated with candy eyes and sprinkles to create a fun Halloween-themed treat that’s perfect for parties and celebrations.
- Prep Time: 15 minutes
- Cook Time: 15 minutes
- Total Time: 45 minutes
- Yield: 24 truffles 1x
- Category: Dessert
- Method: No-Bake
- Cuisine: American
- Diet: Vegetarian
Ingredients
Truffle Base
- 19.1 ounces family-size package of golden Oreos
- ¾ package (8-ounce) cream cheese, room temperature
Decoration
- 12 ounce bag of colored candy melts
- ½ cup color-matching sprinkles
- 24 large candy eyes
Instructions
- Crush Oreos: Place the golden Oreos in a food processor and crush them until well-crumbled to create the base for the truffles.
- Mix with Cream Cheese: Add the cream cheese to the crushed Oreos and pulse the mixture until it is well combined and forms a dough-like consistency.
- Form Truffle Balls: Using a 1 ½ Tablespoon cookie scoop, scoop out the dough then roll each portion into smooth balls.
- Prepare for Setting: Lay each truffle ball on a large cookie sheet lined with parchment paper to prevent sticking.
- Chill: Refrigerate the truffles for 15-30 minutes or up to one hour to allow them to set firmly.
- Melt Candy Coating: When ready to decorate, melt the candy melts in a medium mixing bowl in the microwave for 45 seconds. Stir well, then continue heating in 10-20 second increments, stirring each time until smooth.
- Dip Truffles: Working in batches, dip the chilled truffles into the melted candy until fully coated, ensuring a smooth, even layer.
- Decorate: Place the dipped truffles on a clean sheet of parchment paper laid on a hard surface. Press one large candy eye onto the front of each truffle.
- Add Sprinkles: Sprinkle the top of each truffle with color-matching sprinkles to simulate hair or additional spooky effects.
- Final Chill: Refrigerate the decorated truffles for at least 30 minutes or until the candy coating has fully hardened.
- Serve and Enjoy: Your Monster Eyeballs are now ready to be served and enjoyed at any festive gathering.
Notes
- Use room temperature cream cheese for easy mixing and a smooth dough.
- Colored candy melts can be chosen based on seasonal themes (orange, green, purple, black) for more festive visuals.
- Make sure the truffles are fully chilled before dipping so they maintain their shape.
- Store the finished Monster Eyeballs in an airtight container in the refrigerator for up to one week.
- For variation, use regular chocolate Oreos instead of golden Oreos to create darker truffles.
Nutrition
- Serving Size: 1 truffle (approx. 25g)
- Calories: 130
- Sugar: 14g
- Sodium: 60mg
- Fat: 7g
- Saturated Fat: 4g
- Unsaturated Fat: 2g
- Trans Fat: 0g
- Carbohydrates: 16g
- Fiber: 1g
- Protein: 1g
- Cholesterol: 10mg
Keywords: oreo truffles, halloween treats, no bake dessert, monster eyeballs, candy melts, festive sweets, party snacks