Tiramisu Brownies Recipe: Easy Homemade Dessert Recipe
Introduction
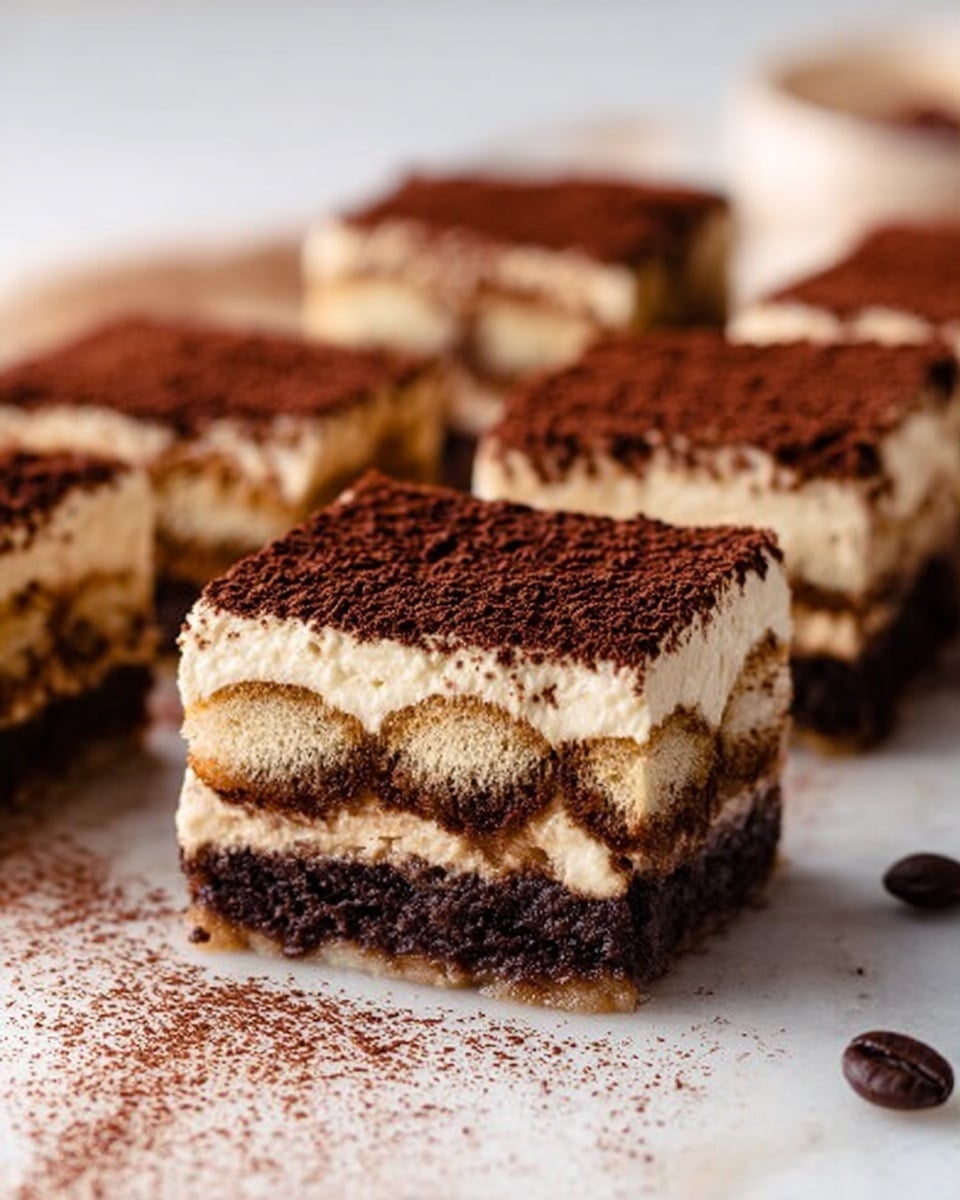
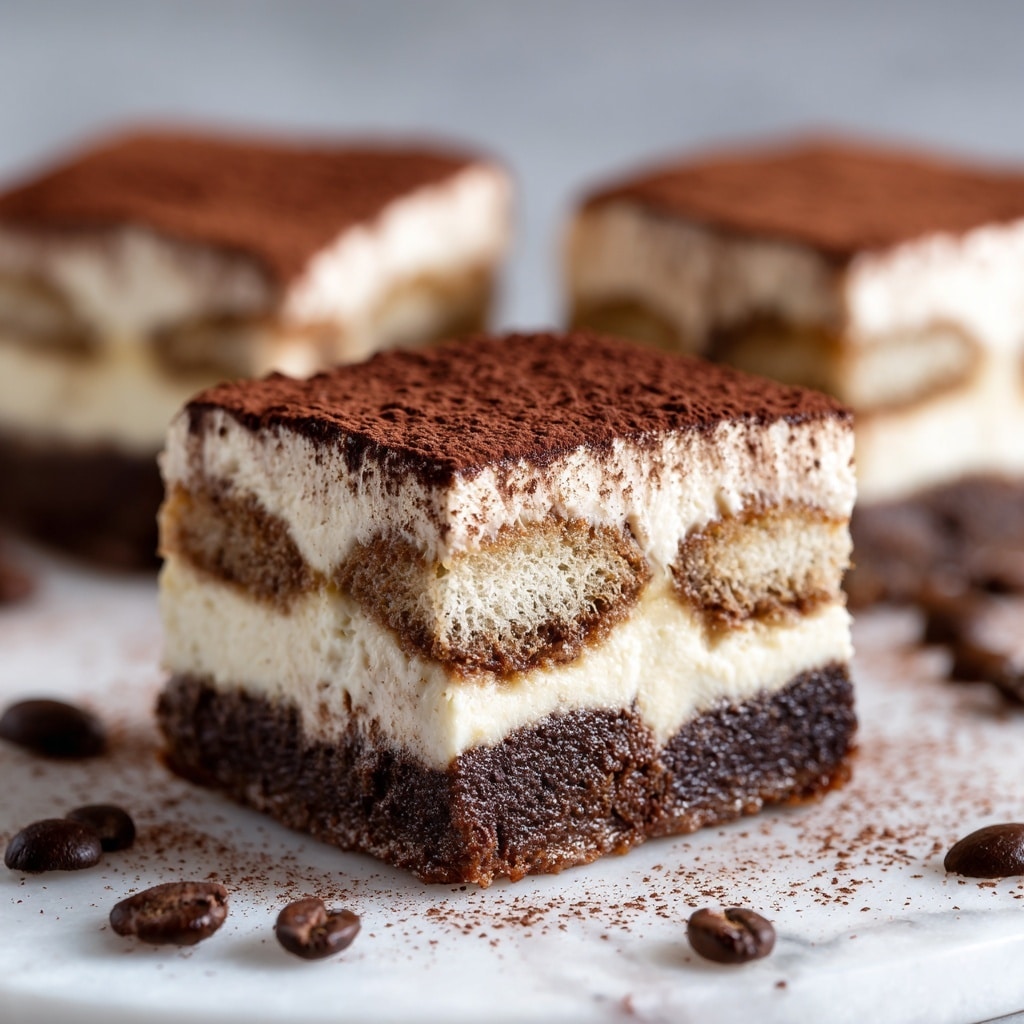
Tiramisu brownies combine the rich, fudgy texture of classic brownies with the creamy, coffee-flavored topping inspired by the beloved Italian dessert. This easy homemade recipe delivers a delightful twist, perfect for impressing guests or indulging in a special treat at home.
Ingredients
- 1/2 cup (120g) butter
- 1/2 cup (60g) unsweetened cocoa powder
- 3/4 cup (95g) all-purpose flour
- 1 cup (200g) granulated sugar
- 1/2 cup (100g) brown sugar
- 3 large eggs
- 1 tsp vanilla extract
- 8 oz (225g) mascarpone cheese
- 1/4 cup (60ml) heavy cream
- 1/4 cup (50g) powdered sugar
- 1 tsp instant espresso powder
- Dark chocolate (at least 70% cocoa content)
- Cocoa powder for dusting
Instructions
- Step 1: Preheat the oven to 350°F (175°C). Line a 9×9-inch brownie pan with parchment paper.
- Step 2: In a microwave-safe bowl, melt the dark chocolate together with 1/2 cup (120g) butter. Stir until smooth and set aside to cool slightly.
- Step 3: Whisk together 1 cup (200g) granulated sugar, 1/2 cup (100g) brown sugar, and 3 large eggs until creamy. Mix in the melted chocolate and 1 tsp vanilla extract.
- Step 4: Gradually fold in 1/2 cup (60g) unsweetened cocoa powder and 3/4 cup (95g) all-purpose flour until just combined.
- Step 5: Pour the batter into the prepared pan and bake for 25-30 minutes. Check doneness with a toothpick; it should come out with moist crumbs, not wet batter.
- Step 6: While the brownies bake, whisk together 8 oz (225g) mascarpone cheese, 1/4 cup (60ml) heavy cream, 1/4 cup (50g) powdered sugar, and 1 tsp instant espresso powder until smooth.
- Step 7: Let the brownies cool completely. Then spread the mascarpone mixture evenly over the top.
- Step 8: Dust the mascarpone layer generously with unsweetened cocoa powder for a classic tiramisu finish.
- Step 9: Refrigerate for at least 2 hours to allow the layers to set and the flavors to meld together before serving.
Tips & Variations
- Use a high-quality dark chocolate with at least 70% cocoa for the best rich flavor.
- For an extra coffee kick, add a tablespoon of brewed espresso to the mascarpone mixture.
- You can substitute the mascarpone topping with whipped cream mixed with a bit of mascarpone for a lighter version.
- Serve chilled for easier slicing and enhanced flavor contrast.
Storage
Store the tiramisu brownies covered in the refrigerator for up to 4 days. Keep them chilled to maintain the creamy mascarpone layer. Before serving, you can let them sit at room temperature for about 10 minutes to soften slightly. These brownies can also be frozen for up to one month; thaw overnight in the fridge before enjoying.
How to Serve
Serve this delicious recipe with your favorite sides.
FAQs
Can I use regular coffee instead of instant espresso powder?
Instant espresso powder is preferred because it dissolves easily and blends smoothly into the mascarpone mixture without adding extra liquid. If using brewed coffee, reduce the heavy cream slightly to maintain the right consistency.
What type of pan works best for this recipe?
A 9×9-inch square baking pan provides the right thickness for these brownies. Use parchment paper to line the pan for easy removal and cleaner edges.
PrintTiramisu Brownies Recipe: Easy Homemade Dessert Recipe
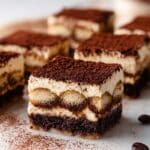
These Tiramisu Brownies combine the rich, fudgy goodness of classic brownies with the creamy, coffee-infused flavors of traditional tiramisu. Featuring a dense chocolate base topped with a smooth mascarpone cream and dusted with cocoa powder, this easy homemade dessert is perfect for any occasion where you want an elegant and indulgent treat.
- Prep Time: 15 minutes
- Cook Time: 30 minutes
- Total Time: 2 hours 45 minutes
- Yield: 9 servings (9×9-inch pan) 1x
- Category: Dessert
- Method: Baking
- Cuisine: Italian-American
Ingredients
Brownie Base
- 1/2 cup (120g) butter
- 1/2 cup (60g) unsweetened cocoa powder
- 3/4 cup (95g) all-purpose flour
- 1 cup (200g) granulated sugar
- 1/2 cup (100g) brown sugar
- 3 large eggs
- 1 tsp vanilla extract
- Dark chocolate (at least 70% cocoa content), quantity approx. 4 oz
Mascarpone Topping
- 8 oz (225g) mascarpone cheese
- 1/4 cup (60ml) heavy cream
- 1/4 cup (50g) powdered sugar
- 1 tsp instant espresso powder
- Cocoa powder for dusting
Instructions
- Preheat Oven and Prepare Pan: Preheat your oven to 350°F (175°C). Line a 9×9-inch brownie pan with parchment paper to prevent sticking and ensure easy removal.
- Melt Chocolate and Butter: In a microwave-safe bowl, melt the dark chocolate along with 1/2 cup (120g) butter. Stir until the mixture is smooth and let it cool slightly to prevent cooking the eggs in the next step.
- Mix Sugars and Eggs: Whisk together 1 cup granulated sugar, 1/2 cup brown sugar, and 3 large eggs until the mixture turns creamy and slightly fluffy. This helps incorporate air for a tender texture.
- Combine Wet Ingredients: Stir the melted chocolate mixture and 1 tsp vanilla extract into the eggs and sugar until fully combined.
- Add Dry Ingredients: Gradually fold in 1/2 cup unsweetened cocoa powder and 3/4 cup all-purpose flour into the chocolate batter. Be careful not to overmix to keep the brownies fudgy.
- Bake the Brownies: Pour the batter into the prepared pan and bake for 25 to 30 minutes. Use a toothpick inserted into the center to test doneness; it should come out with moist crumbs, not wet batter.
- Prepare Mascarpone Topping: While the brownies bake and cool, whisk together 8 oz mascarpone cheese, 1/4 cup heavy cream, 1/4 cup powdered sugar, and 1 tsp instant espresso powder until smooth and creamy.
- Cool and Top Brownies: Once the brownies have cooled completely, spread the mascarpone mixture evenly over the top using a spatula for an even layer.
- Finish with Cocoa Powder: Sift a generous layer of unsweetened cocoa powder over the mascarpone topping to give it the classic tiramisu look and a slight bitterness to balance the sweetness.
- Chill to Set: Refrigerate the assembled brownies for at least 2 hours to let the layers firm up and the flavors meld together beautifully before serving.
Notes
- Ensure the melted chocolate is not too hot before mixing with eggs to avoid curdling.
- Use high-quality dark chocolate for the best rich flavor in the brownie base.
- For a stronger coffee flavor, you can dissolve the espresso powder in a teaspoon of hot water before adding to the mascarpone mixture.
- The brownies should be served chilled for the best texture and flavor.
- Store leftovers in the refrigerator covered tightly and consume within 3-4 days.
Keywords: tiramisu brownies, tiramisu dessert, easy homemade tiramisu, chocolate brownies, mascarpone dessert, coffee flavored brownies